What is GPS and How does GPS work? GPS (Global Positioning System) GPS is a satellite-based navigation system used byadminMarch 22, 2025
How to subset a satellite image in ArcGIS? The ability to subset a satellite image to concentrate on a particular area of byadminMarch 4, 2025
How to Change Band combination of satellite image in ArcGIS Use of Band Combination in Satellite Image Processing In satellite image byadminFebruary 24, 2025
Layer Stacking or Band composite of Landsat Satellite data using ArcGIS Integration of numerous spectral bands of Landsat byadminFebruary 17, 2025
GIS Tutorials GNSS Uncategorized What is GPS and How does GPS work? GPS (Global Positioning System) GPS is a satellite-based navigation system used byadmin
GIS Tutorials Remote Sensing RS Analysis How to subset a satellite image in ArcGIS? The ability to subset a satellite image to concentrate on a particular area of byadmin
GIS Tutorials Remote Sensing RS Analysis How to Change Band combination of satellite image in ArcGIS Use of Band Combination in Satellite Image Processing In satellite image byadmin
GIS Tutorials RS Analysis Layer Stacking or Band composite of Landsat Satellite data using ArcGIS Integration of numerous spectral bands of Landsat byadmin
GIS Tutorials RS Analysis ArcGIS Tutorial on Adding Satellite Image/Basemaps in ArcGIS Overview A key element of Geographic Information Systems (GIS) is satellite byadmin
GIS Analysis Remote Sensing applications Geospatial Technology – An Approach to invest in our Planet (Earth Day Special) Geospatial Technology, which is also called Remote Sensing and GIS Technology byadmin
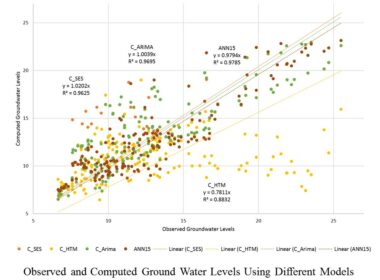
GIS Analysis Geospatial Techniques for Prediction of Ground Water Level Ground Water Level Prediction using Geospatial Technology and Mathematical byadmin
GIS Analysis GIS Used for Rainfall Data Analysis Rainfall data Analysis Using ARC/GIS GIS software can be used to generate byadmin
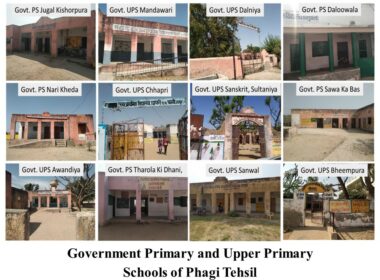
GIS Analysis GIS for Location Data Generation Location of Government Schools in Phagi Tehsil Locations database mapping play byadmin
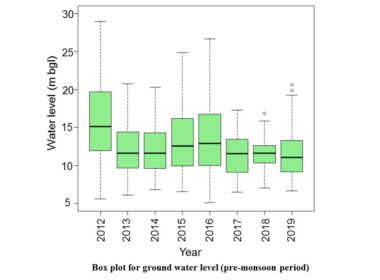
GIS Analysis GIS USED FOR GROUNDWATER LEVEL ANALYSIS & PREDICTION Groundwater Level Scenario Analysis using GIS-Phagi Tehsil (2012-2024) Erratic byadmin